|
Intro: I wanted to share something with everyone before it actually happens. I am going to be challenging myself in April, 2017 by learning to create on small canvases.
Details: By small canvas, I am not referring to the tiny canvases that you can purchase with an easel in art stores. I am referring to any surface in any shape and form that is no bigger than 5"x5"x5". I have always worked with a bigger surface and have always loved to put in details on my works. I want to see if I can still accomplish those types of details on a smaller scale and thus created this challenge for myself. When I mentioned it to a few friends they got excited about it too... and now it has turned into something public and huge! Do you want to participate? The challenge is going to take place during the whole month of April. You can create anything (any theme) in any media on any surface type as long as the surface is small. I'll be posting the official details a week before the challenge starts in April. For those on dA: yes you'll get a chance at getting features along with gallery submission to groups (with group features towards the end). Goal: the goal is to get better at working on a smaller canvas or try something (new media or canvas type) for those that have been working on them. At the end I am going to encourage anyone who participates in assembling their work into something presentable. I am going to create one artist tile a day and then assemble an album. Get ready! So if you want to start planning now then go for it! Think about themes or media that you want to tackle. Or perhaps you have been wanting to assemble something huge out of small art. To get you started here are some types of small canvases to consider: paper dolls, twinchies, inchies, rinchies, artist tiles, domino tiles, domino books, match boxes, tins, glass bottles, small books, tea bags, ATCs, actual small canvases, postcards, envelopes, other types of cards (oracle, tarot, etc), mini sculptures, handmade clay items, dices/cubes... these are just a few that I could think off the top of my head. The possibilities are endless on the type of canvas you could work with... as long as it is 5"x5"x5" and smaller. Extra: There is a countdown widget on my ABOUT page for anyone interested in keeping track. You can click on the widget to save a copy for yourself... here is a link for those interested in sharing: Countdown on the challenge starting in April
0 Comments
Intro: I decided to start creating art for two separate series of my own: Skyscapes and Whimsical Landscape. I was recently requested to participate in personal trades that required me to create a nature themed ATC that could include trees or animals or just landscapes.
What I created: I ended up making two ATCs that have trees in them (both inspired by simple Smartphone Emoji) and a third ATC depicting a sunset with birds flying. I liked the idea and decided that I needed to keep these two themes going in the future and thus added all three cards to series. All three were created using the typical watercolor paint with detailing in Le Pen marker and a white gel pen. Be sure to see more art from these two series in the future as I have already gotten requests for more cards to be made in both series. Trade status: All three have been traded upon uploading to ATCsForAll. Intro: I decided to use the rest of the page that I created my works for the Valentine Twinchies Swap. I ended up making eight more twinchies and three domino tiles.
What I created: The twinchies continue the theme of Valentine's Day and hearts from the swap. I used Valentine themed cookies as inspiration for the hearts that I made. I also created rose flowers on three small sections that were left over (1"x2"). I have been wanting to dedicate art to the Beauty and the Beast story from Disney for a few months now but just could not come up with what to create. Seeing as I had practiced making a rose using a tiny brush already on one of the twinchies I decided to create just that... the rose given by the evil fairy in the story. Because I already had three tiles that I randomly put down gradient colors on I decided to paint the same rose in different colors on the other two. The hearts are a continuous part of the Valentine 2017 Series as I might still continue to make more art with that theme. Note: All of these are currently available for trading/swaps except for the red rose tile. I might end up using a few of these to create a cover page for a journal but in the meantime everything is available. Domino Tiles: A little bit about Domino Tiles... First here is an example of domino tile art found on Etsy. When referring to domino tiles it can mean work created right on top of a normal domino tile or a tile that is domino tile sized. The dimensions should be 1"x2" in order for it to be considered as a domino tile. Some artists even complete a collection and create Domino Books. I'll be writing more about this when I create a Domino Book of my own but for the moment I leave you with just this information. Feel free to Google Domino Books if you want to know more about them. YouTube also has tutorials on making them too. Intro: My first twinchies were created as part of the Valentine Twinchies Swap. These are 2"x2" as the name states.
What I created: I made 4 twinchies for this swap - one for the host as a gift and three for the actual swap. All of them were done in watercolor with details added on using a white gel pen, Le Pen marker, and Puffy Bead Paint. All four have been mailed off...now waiting on my swaps. Intro: I participated in a swap called Animal Play ABC. Currently the first the letters of the alphabet were focused...with plans for the future to continue doing swaps till we have the entire alphabet complete.
What I created: I made three cards as required for the swap plus an extra as a gift to for the host. All of the cards were done in watercolor, with Le Pen marker and a white gel pen used to add the finishing touches. The animal/card details in order:
Intro: The second ATC swap that I have participated in has a bit of historical theme - Moulin Rouge. The Moulin Rouge Swap is open to all media and had no real hard rules... just the typical ones that all swaps have.
What I created: It was a challenge in picking exactly what subjects to choose for the cards... I ended up painting 2 different Can Can Girls and the famous Moulin Rouge Structure which looks like a windmill. Again I used watercolor to paint the basics... then finished off with Prismacolor Colored Pencils and Le Pen marker. Final thoughts: I honestly think I need to invest in a marker that has a really fine tip...this fine tip is not fine enough. Creating the details like the features of the face was difficult as the line was too thick. I am not even sure if I want to spend time editing any of these cards... I feel like just creating more cards with this theme and perhaps trying different markers. Again details on these cards can be viewed at any of my 2 galleries that I post actively in along with better quality images. Intro: I am sure many people have run across these words online already... ACEO (Art Cards, Editions, and Originals), ATC (Artist Trading Cards), Inchies (1"x1" canvas art), Rinchies (1" round canvas art), and Twinchies (2"x2" canvas art).
What is the difference between ATC and ACEO? I am not going to go into details on them except provide a link to a nice place that I discovered... they have a better description of both and in-depth details as well. ATC for All - difference between ACEO and ATC Altered-Art - all about ATC and what you can do with them Also a breakdown of the other three forms of art: What are inchies? ATCs: This is suppose to be more of an in depth discussion on ATCs... but I am not going to bore anyone with details that they already know. I am simply going to post my thoughts about ATCs and the future of this blog when it comes to artist trading cards. I am going to continue using artist trading cards as they provide a good exercising form for all media. I am going participate in a monthly contest on ATCsForAll once in awhile just to test my creative juices but that's about it. I am going to participate in swaps if they seem inspiring enough. I can see myself selling prints of the cards but not in the near future... as they are for exercise purposes only - for practice. I am going to create ATCs as gifts for friends and family but nothing that I'll be posting online to sell. I am going to focus on creating polymer clay (with some air dry clay) trading cards...perhaps creating a different standard size if the traditional 2.5"x3.5" does not work out. I plan on creating a custom display item for the cards as well...perhaps even a way to store them. I can see myself in the future creating multiple ATCs that are to be used as reference (like swatches that artists create for polymer clay colors). If anyone would like to see details (a tutorial perhaps even a video) on how to create something similar do contact me or comment here. Depending on the demand I might create that if I end up making a YouTube channel. Miniature ATC: So there exists a standard size for all ATC created as it must fit a clear plastic sleeve (penny sleeve). Which means that the card can not be too bulky otherwise it is not going to fit in the sleeve. After some research I ran into miniature ATCs... which are only 1.5"x2.5" or 1.75"x2.5". This again reminds me of small artist tiles... or even collectible cabochons (or even inchies). This is something to really look into especially with polymer clay. I can see a collection of miniature ATCs that look like tile samples... or button designs. Inchies, Twinchies, Rinchies: These are smaller forms of ATCs that serve a similar purpose to some extent. Some collectors do go to the next level of creating something bigger by assembling multiple ATCs (like this folded card). Typically inchies (along with rinchies and twinchies) are traded, collected, sold, gifted, etc just like ATCs. Some artist online share their ideas on making fabric inchies used to assemble quilts and other wearable art. The only reason I bring these up is due to the small canvas size, they are quick to make. Inchies are 1"x1" while twinchies are 2"x2" canvas art. Rinchies are round shaped canvas works that are 1" in diameter (the size of bottle caps) and there are B'Twinchies that have varied dimensions. It is great putting them together like a puzzle to create another work of art. These can be used on other artworks, like on ATCs or greeting cards and albums, etc. I think they would serve as good canvas for exercises... even in clay or other 3D media. Final thoughts: I have determined that if I am going to post my ATCs for sale at any point in the future I'll have to organize things once again...which I do not have the time for right now. In the future perhaps I'll think about adding them to a store online or even setting up a store on this blog, but right now I do not plan on selling my ATCs (only trading upon request). This goes for any inchies, twinchies, or rinchies that I create as well. I'll be posting these creations in the future as I make them on here. I have entered organized swaps already to have themes to work with... and plan on entering some more in the future. I'll also be creating these as parts of challenges and perhaps contests...? If anyone is interested in trading ATCs please do contact me I have an account on ATCs for All, my username is ParadoxSketchbook. Intro: my first ATC swap!!! I participated in the BEES Knees Swap on ATCsForAll and created 3 ATCs - as required.
What I created: The theme was bees... there has to be at least one bee on the card and the media is unlimited. As long as the card can fit in a penny sleeve it works! I wanted to create something childish so for one of the cards I created a "pop art" type of background with greens and yellows. Then I painted small bees scattered around on the card. I even went in and added pathlines for the bees to give it more of a childish look. For the other two cards I wanted to actually spend some time painting an actual bee...and in a way get comfortable with the shape and form of a bee. All three ATCs were created by first painting in watercolor then adding on details where needed with Prismacolor Colored pencils and Le Pen fine tip marker. I have a link to my ATCsForAll gallery as well as my DeviantArt gallery in the Author section of my blog as buttons. Feel free to browse. What I created: I participated in a MMH (Make Me Happy) swap for inchies on. I got the theme of Emoji... and had to create 6 inchies. These are all 1"x1" as all inchies are. For details on each one and a better quality image visit my gallery.
I painted all 6 inchies using watercolor then went over some areas using Prismcolor Colored Pencils and Le Pen fine tip marker. I absolutely loved how these turned out... they look oh so much better when held in your hands because they are just tiny and adorable. I am really starting to like the idea of such a small canvas. It really is hard to work in details but the result is very satisfying.. I felt like I had accomplished something truly grand upon completing these inchies. Further thoughts: This is giving me an idea for artist tiles... I need an excuse to make those anyways so might as well use this theme. If you look at the standard emoji that are common across multiple platforms, you'll see some "scenery" related emoji. I am thinking about painting those on 3.5"x3.5" artist tiles (I recently got an entire pack gifted). So be on the lookout for artist tiles! Possible experiments: I am wondering now how these would look if I had created them using ink... Intro: I wanted to dedicate a small post about the back of my ATCs. Some artist create their own templates while others download them (there are free templates available online). I created my own quick template using only two programs: I used cooltext.com for generating a simple title and then using MS PowerPoint I put together a template with two variations. Cooltext.com has many fonts and icons available to use for free... so if you want to create your own template from there you can. I have included the MS PowerPoint template at the bottom of this post along with the image version that you can use as well. These are free to use... no credit required. So here is a breakdown of what is included on the back of my artist trading cards... Title - the name of the card (the art itself) Series/Collection - the series or collection that the card is a part of (if any) Date & No. - the date that the art was declared as "complete! no more adjustments" and the number of the card in the series (if it belongs to a series) Artist - the artist's name who created the card (me) Signature - the official signature of the artist (only available on the left template; I left a blank spot for the signature on the right template as my signature actually does not look good on top of a line) Contact - e-mail and/or website... address if you want or even phone number Notes - this small spot could contain notes on the art or even a message to the receiver of the card (I kept this in mind for giving ATCs out as gifts). This could also be used to mention the media of the art. 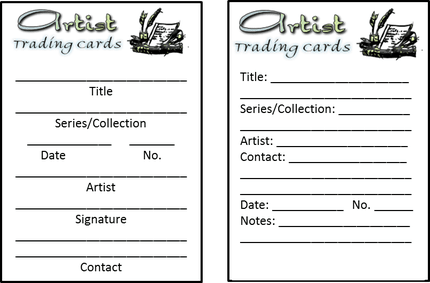 Final thoughts: the cards are actually too small to add anything else and personally I think adding way too much information on the card itself takes away from the guidebook. Having a guidebook is a great tool to get your thoughts flowing as you are not only thinking about what you have created but now you have to put it down in words... writing practice - another form of art.
Feel free to print a copy of the image that I have posted. The black borderline is 2.5" by 3.5" the typical ATC size. When I put these on my cards I cut the borderline away if I am creating curved corners but I keep the borderline if the cards are cut simply. I have already altered this to have a version for participating in swaps to include location and Swap name... so you can alter it too. Some have altered a similar template by adding something fancier at the top instead of the basic title that I have. You can download the MS PowerPointRaw template or printable MS Word document for any of the two templates from this folder: Public Google Drive Folder |
Author: RejiI used to be a digital artist but switched back to traditional art as I feel more connected with the art I create this way. Currently, I create art whenever I can for art trades and commissions. I have worked with clay (earth clay to modern forms like Polymer, Sculpey, even Air Dry clay) along with watercolors, acrylics, oil paints, pastels, charcoal, pen and pencil drawings, India ink, Chinese Colors, wires, felt fabric, yarn, weaving, basket making, and the list goes on and on. I am currently working on exploring nail art, make-up, dress making, scrapbooking, and small canvas art. Archives
April 2017
Categories
All
Copyright © Reji Randhawa | The Paradox Sketchbook. All rights reserved.
 All work on this blog is licensed under a Creative Commons Attribution-NonCommercial-NoDerivatives 4.0 International License. |

 RSS Feed
